1 Overview – UsersWP Membership Plugin
The UsersWP Membership plugin is a powerful tool that allows website owners to monetize user registrations and restrict content based on user types. With this plugin, you can create paid registration plans and control which users can access specific content, pages, or features on your site.
What You Can Do with UsersWP Membership
- Charge for User Registrations – Require users to purchase a membership plan before they can register or access certain site features.
- Charge Recurring Fees – Set up monthly, yearly, or custom subscription plans to generate ongoing revenue from members.
- Restrict Content Based on User Type – Limit access to pages, posts, or specific sections of your site based on the user’s membership level.
- Offer Multiple Membership Levels – Create different plans, such as Free, Basic, Premium, or VIP, each with unique price, benefits and access permissions.
- Integrate with GetPaid Payment Gateways – Accept payments seamlessly using supported payment methods.
- Create a Paywall – Like many news websites, you can show article excerpts to free users while allowing full access only to paying members.
Practical Use Cases
- Exclusive Online Communities – Create a private forum or social network where only paid members can join and interact.
- Premium Directory Listings – Allow users to submit and manage directory listings, but only if they have an active paid membership.
- Job Boards & Freelance Platforms – Charge employers for posting jobs or freelancers for accessing premium job opportunities.
- Educational Portals – Restrict access to premium courses, guides, or tutorials based on membership level.
- VIP Content & Perks – Offer exclusive content, downloadable resources, or special perks to paying members only.
- News & Media Paywall – Control access to articles by displaying only excerpts to free users and requiring a membership to read full articles.
Whether you’re building a membership site, a business directory, a paywalled news platform, or a gated content site, UsersWP Membership makes it easy to control access and monetize user registrations.
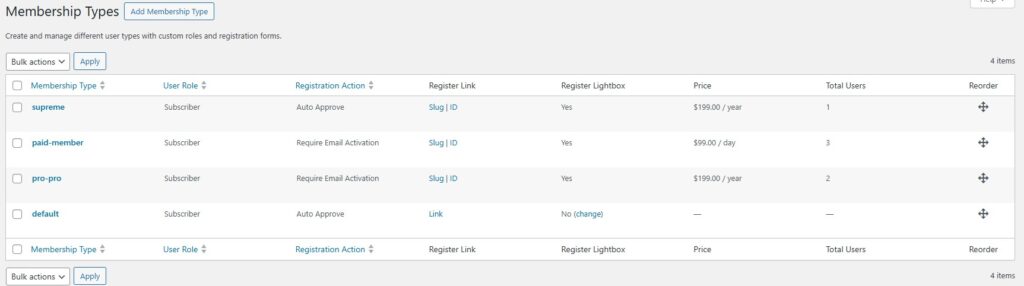
2 How to Create a Membership Type
- Go to UsersWP > Membership Types in your WordPress dashboard.

- Click on “Add New” > “Add Membership Type” to create a new membership.

- Fill in the following fields:
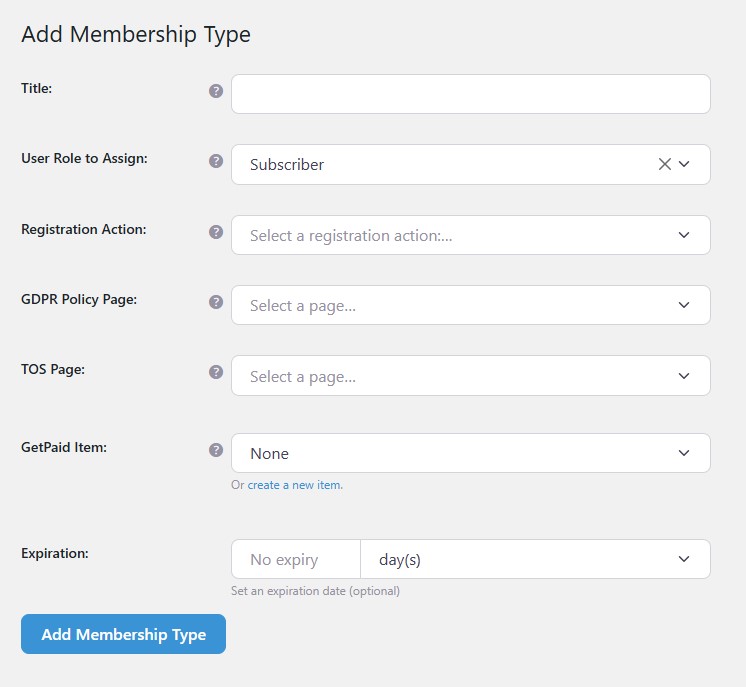
- Title: Enter a name for the membership (e.g., Free, Premium, VIP).
- User Role to Assign: Choose the WordPress user role that will be assigned to users with this membership.
- Registration Action: Select how user registration is handled:
- Auto Approve – Users are approved immediately upon registration.
- Auto Approve + Auto Login – Users are approved and automatically logged in after registration.
- Require Email Activation – Users must verify their email before their account is activated.
- Redirect Page (only for Auto Login): If you select Auto Approve + Auto Login, an additional field appears where you can choose where users are redirected after login. Options include:
- Last User Page – Redirects users to the last page they visited.
- Default Redirect – Redirects users to the default page set in your settings.
- Custom Redirect – Allows you to specify a custom page. If selected, an additional field appears to enter a Custom Redirect URL.
- GDPR Policy Page: Select a page with your GDPR policy (optional).
- TOS Page: Choose a Terms of Service page (optional).
How to Set Up a Paid Membership
If the membership requires payment, you need to associate it with a GetPaid Item:
- In the GetPaid Item field, select an existing payment item or click “Create a new item” to configure a new one.
- If creating a new item, a pop-up form will appear with the following options:


- Item Title – Name the item (e.g., “Premium Membership”).
- Item Price – Set the membership fee and billing cycle (e.g., $10 every 1 month).
- Let Customers Name Their Price (Optional) – Enable this if you want users to set their own price within a defined range.
- Charge Customers a Recurring Amount (Optional) – Enable this for automatic subscription payments. Supported payment gateways include Stripe, PayPal, Bank Transfer, and Authorize.Net.
- Minimum Price – If “Name Your Price” is enabled, set a minimum amount users can pay.
- Maximum Renewals – Define how many times the membership can renew automatically. Set to 0 for unlimited renewals.
- Free Trial – Offer a free trial period before charging the user (e.g., 7 days free).
- Click “Create Item” to save the payment item and link it to the membership type.
Finalizing the Membership Type
- Expiration: Set an expiration period for the membership (e.g., 30 days) or select “No expiry” for lifetime access.
- Click “Add Membership Type” to save and activate the membership.
This allows you to create multiple membership types, free or paid, with different pricing, access levels, and renewal settings to fit your site’s needs.
3 Editing Registration Form Fields & Lightbox Settings for Membership Types
UsersWP allows you to customize the registration form fields for each membership type and choose whether the registration form appears in a lightbox popup or a dedicated page.
How to Edit Registration Form Fields
Each membership type has its own registration form fields that can be customized. To edit them:
- Go to UsersWP > Form Builder in your WordPress dashboard.
- Locate the registration form for the membership type you want to modify by selecting the User Type from the dropdown.
- Add, remove, or rearrange fields as needed.
- Click Save Changes to apply the updates.
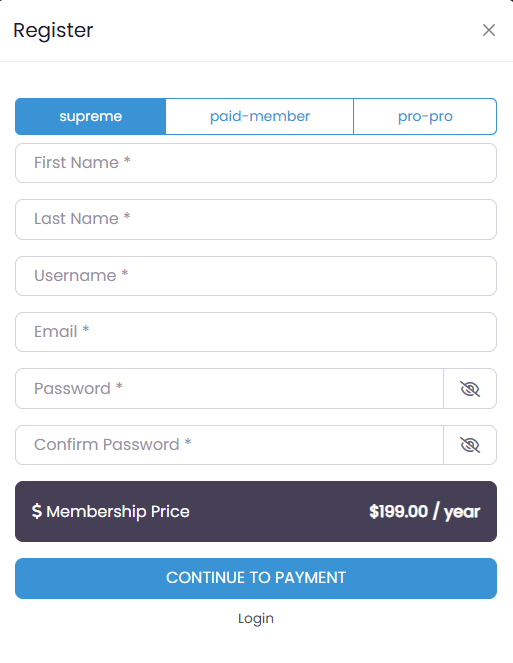
How to Add Membership Registration to a Lightbox or Dedicated Page
By default, you can choose whether a membership type’s registration form opens in a lightbox popup or loads on a dedicated page.
To configure this:
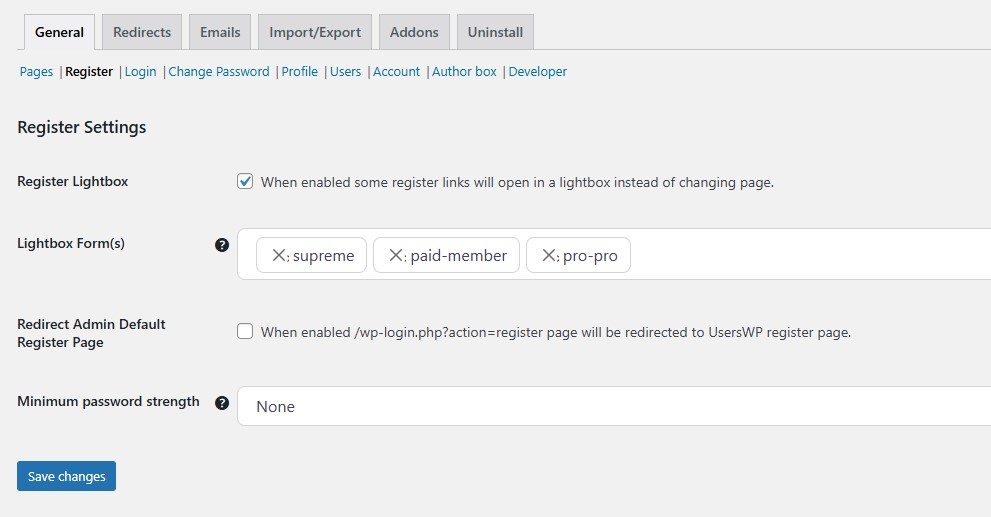
- Go to UsersWP > Register > Lightbox Form(s).
- Select or deselect the membership types that should appear in the lightbox popup.
- Click Save Changes to update the settings.

If a membership type is not selected for the lightbox, users will be directed to a dedicated registration page instead.
You can find links to a dedicated registration page in the user types list.
Alternatively, if you want to change the registration form settings directly from the membership type list:
- Navigate to UsersWP > Membership Types.
- Locate the membership type you want to update.
- Click Change under the Register Lightbox column.
- Adjust the settings accordingly.

The registration page and lightbox can be adjusted to show any membership types
This flexibility allows you to control how users sign up for different membership levels while keeping the registration process smooth and intuitive.
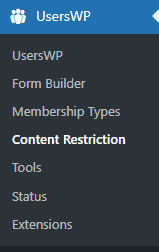
4 Content Restriction
The UsersWP Membership Plugin allows you to restrict access to specific content based on user roles or membership types. You can set up rules to control who can view certain pages, posts, or sections of your website.
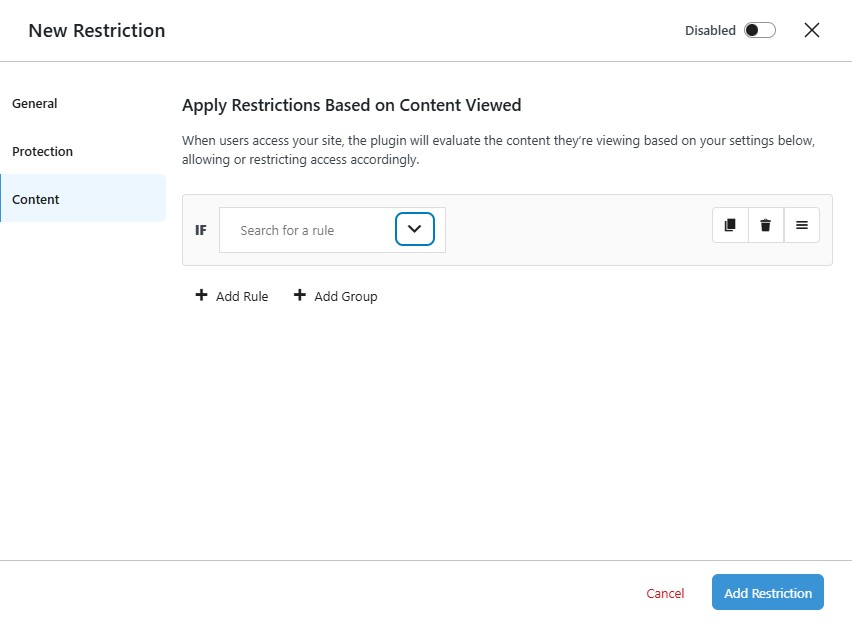
How to Add a New Content Restriction
- Go to UsersWP > Content Restriction in your WordPress dashboard. 📌 Insert the screenshot of the “Content Restriction” menu here for clarity.
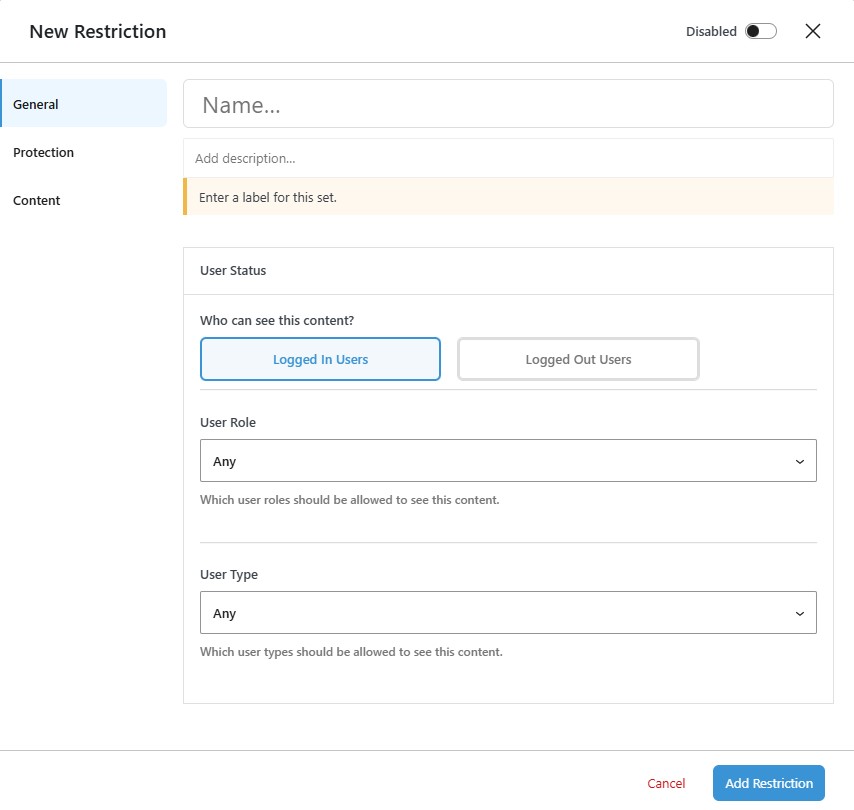
- Click “Add New Restriction” to open the restriction settings panel.
A popup with three configuration tabs will appear:
1️⃣ General Settings
In this tab, you define who can access the restricted content:
- Name: Give your restriction a meaningful name for easy management.
- User Status: Choose whether the restriction applies to:
- Logged-in Users
- Logged-out Users
- User Role: Select which user roles can access the content (e.g., Subscriber, Editor, Administrator).
- User Type: Choose which membership types can view the content. This is useful for restricting content to paid members only.

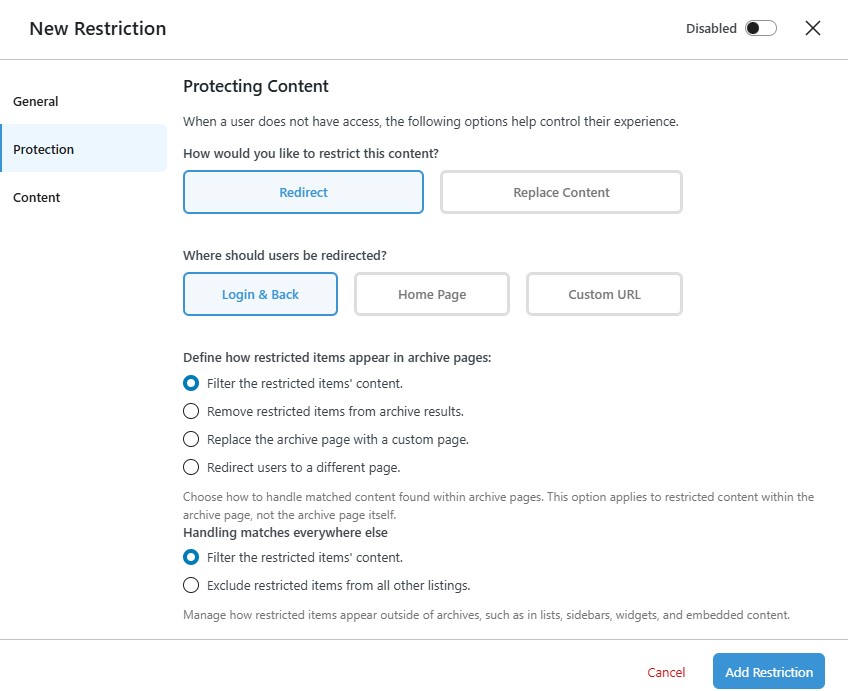
2️⃣ Protection Settings
This tab controls what happens when a user tries to access restricted content:
- How would you like to restrict this content?
- Redirect – Send users to another page.
- Replace Content – Display alternative content instead.
- Where should users be redirected?
- Login & Back – Redirects to the login page and then back to the restricted content after login.
- Home Page – Sends users to the homepage.
- Custom URL – Allows you to specify a custom redirection page.
- How should restricted content appear in archive pages?
- Filter the restricted items’ content – Display excerpts while hiding full content.
- Remove restricted items from archive results – Exclude restricted content from archive pages.
- Replace the archive page with a custom page – Show a different page instead of the restricted content.
- Redirect users to a different page – Send users to another page when they try to access restricted content.

3️⃣ Content Settings
This tab lets you define which content should be restricted by creating rules. You can apply restrictions to:
- Entire Site – Restrict access to all pages, posts, and archives.
- Home Page – Block access to your homepage.
- Blog Index – Restrict access to the main blog page.
- Search Result Pages – Prevent restricted content from appearing in search results.
- 404 Error Pages – Control what users see when they encounter a missing page.
- Post Archives – Restrict category, tag, or custom post type archives.
- Specific Posts or Pages – Select individual posts or pages to restrict.
- Custom Taxonomies – Limit access based on specific tags, categories, or custom taxonomies.

Example Rules:
- Restrict the entire site except for the homepage: Useful for creating a members-only website where only logged-in users can browse.
- Restrict blog posts with a specific category (e.g., “Premium Content”): Only paid users can read premium blog posts.
- Restrict events or properties in a directory site: Make specific listings accessible only to premium members.
You can add multiple rules using AND/OR operators and even group rules together to create advanced restriction logic.
Once all settings are configured, click “Add Restriction” to save the rule.
With these powerful restriction tools, you can easily monetize content, create exclusive areas for members, and manage user access efficiently.
5 Restricting Template Parts with the Blockstrap Page Builder Plugin
The Blockstrap Page Builder plugin allows you to restrict specific template parts by controlling the visibility of any content inside a container block. If you also have the UsersWP Membership Plugin, you can restrict template parts based on membership types, ensuring only users with selected memberships can view them.
How to Restrict Template Parts
- Go to Appearance > Editor in your WordPress dashboard.
- Open the template where you want to restrict specific content.
- Click Edit to modify the template.
- Locate the container block that contains the content you want to restrict.
- In the right column, go to Block Options > Advanced > Visibility Conditions and click Set Block Visibility.
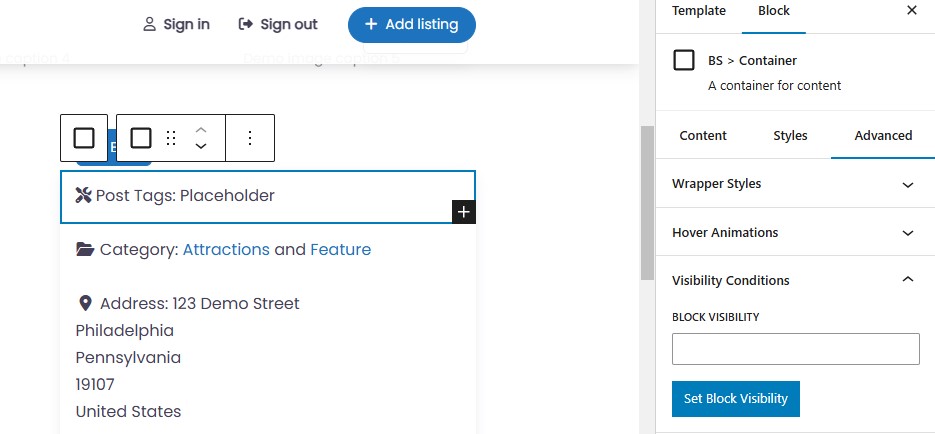
- A popup will appear with Block Visibility Settings, allowing you to configure restriction rules.

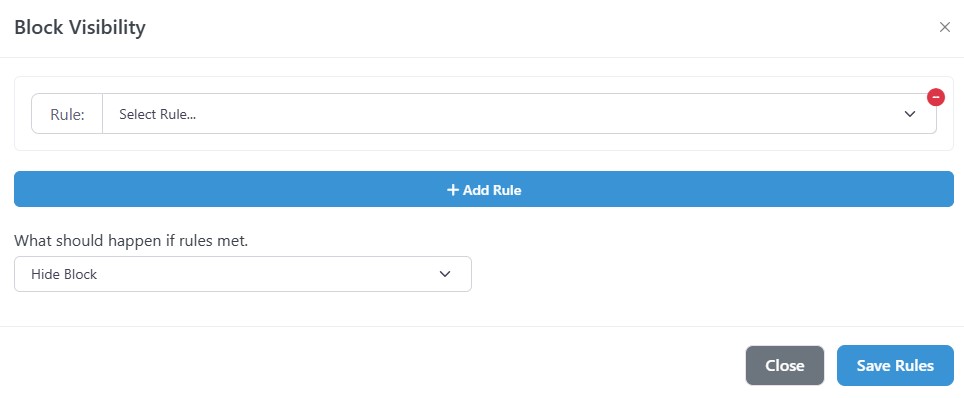
Visibility Rules
When setting visibility conditions, you can choose from the following rules:
- Logged In – Restrict content to logged-in users.
- Logged Out – Restrict content to logged-out users.
- Post Author – Only the post author can view the content.
- Specific User Roles – Restrict access to selected WordPress roles (e.g., Subscriber, Editor, Administrator).
- Specific Membership Type (Requires UsersWP Membership Plugin) – Restrict access to users with a specific UsersWP Membership Type.
- GD Field – Restrict content based on specific GeoDirectory fields.
You can also add multiple rules using AND/OR operators and even group rules together for more advanced restriction logic.
Actions When Rule Is Met
Once a restriction rule is set, you can define what happens when the condition is met:
- Hide Block – The restricted content is completely removed from the page.
- Show Custom Message – Display a custom message instead of the content.
- If selected, two new fields appear:
- Custom Message Type – Choose a predefined style for the message.
- Custom Message Content – Enter the message text to display.
- Show Page Content – Replace the restricted content with the content from a selected page.
- If selected, a new field will appear where you can choose the page to display.
- Show Template Part – Replace the restricted content with a different template part.
- If selected, a new field will appear where you can choose the template part to show instead.
Example Use Cases
- Restrict sections of a homepage to premium members only, displaying a signup prompt for non-members.
- Show different navigation menus depending on whether a user is logged in or out.
- Display a custom message to users without the correct membership level, encouraging them to upgrade.
- Swap entire template sections based on user roles, allowing for dynamic page layouts.
With Blockstrap’s content visibility settings, you can fully customize what different user types see, allowing for advanced personalization and content restriction across your website.