


Setting up the Instagram App
- Login to your Instagram developer account.
- Click on the Register a New Client button:

- Fill out the form with the following values and then click on the Register button:
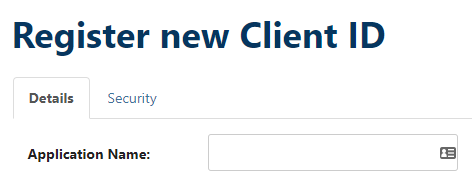
- Application Name: You can use the name of your website
- Description: For example “my website” Social Login
- Company name: Your company name
- Website: Enter the URL of your own website, for example https://mysite.com/
- Valid redirect URIs: You can find the correct URL at UsersWP > Social tab > Instagram sub-tab and will be in this format: https://mysite.com/uwphauth/instagram
- Privacy Policy URL: Add a link to your website’s privacy policy page
- Contact email: Your contact email
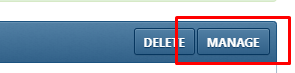
- Once registered, click on Manage:
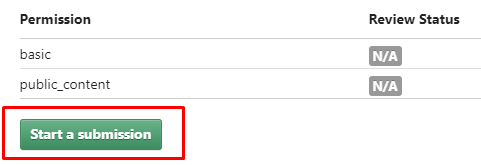
- On that page, click the Permissions tab:

- Now click on Start a submission:
- Complete the Review stage as follows:
- Select My app allows people to login with Instagram and share their own content.
- API use case: For example: Our users can login with their Instagram account on our WordPress site. We only get their basic data.
- Video Screencast URL: Make a video on how you use Social Login button for Instagram.
- Validation by Instagram may take few days.
- Now copy and paste the Client ID and Client Secret to UsersWP > Social tab > Instagram sub-tab.
- Do not activate the Instagram option until your Instagram application has been reviewed and is out of sandbox.
Setting up the Facebook App
- Login to your Facebook developer account.
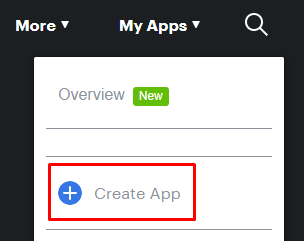
- Go to My Apps > Add a New App
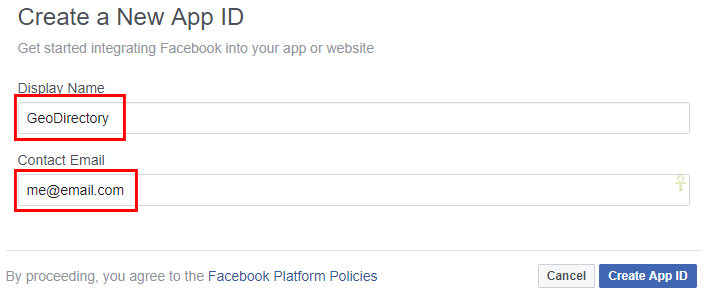
- On the next screen, add a Display Name and your email, and then click Create App ID:
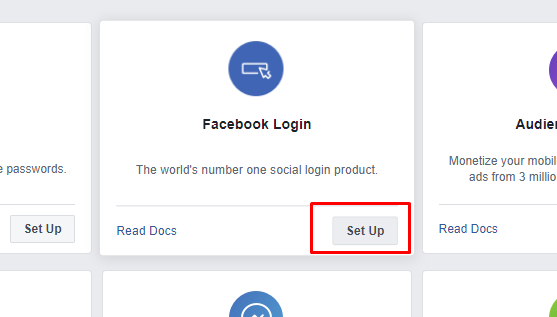
- On the Next page “Add a Product” select Facebook Login and click Set Up:
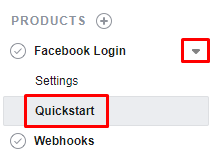
- In the sidebar, choose Facebook Login > Quickstart:
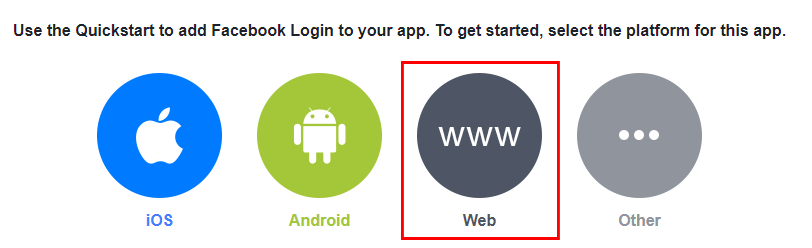
- Choose Web:
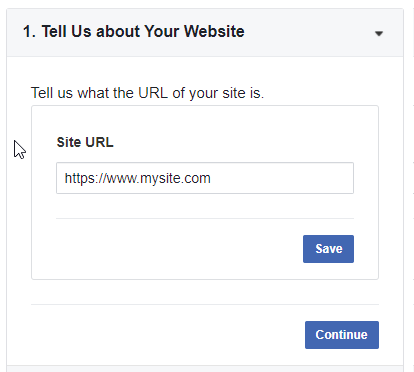
- On the next screen, all you have to enter is your site URL, exactly as it is at WP Settings > General > WordPress Address (URL):
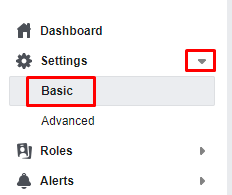
- Go to Settings > Basic:
- Enter your website domain (not URL or web address), example: mysite.com:
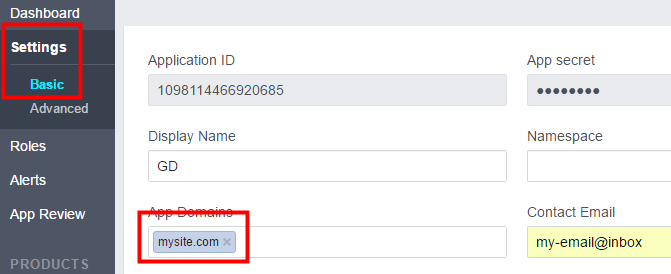
- Click Save Changes.
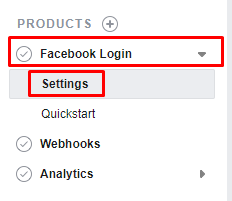
- Go to Products > Facebook Login:
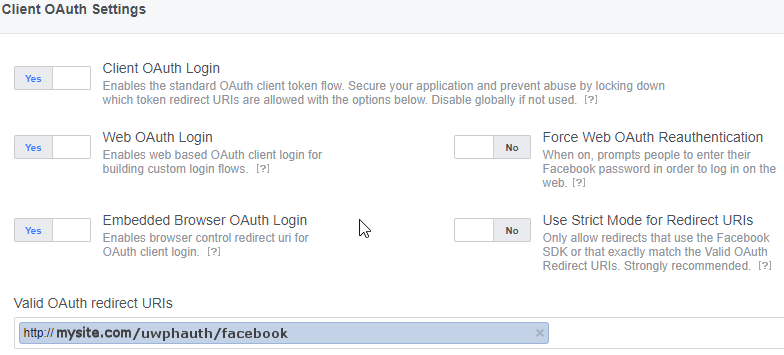
- You need to enter your OAuth redirect URI, which you can find at UsersWP > AddonsSocial tab > Facebook sub-tab:
 The exact URL should be in the format:
http://mysite.com/uwphauth/facebook
or if you have a secure site:
https://mysite.com/uwphauth/facebook - You may already have other URIs there and this URI should be in addition, make sure you get the URI exactly right, if you use www. and your site does not use it then it will fail.
- Make sure on that page that Web OAuth Login is set to Yes:
- Open your website in another tab or window and navigate to UsersWP > Social tab > Facebook sub-tab > :
- Copy and paste the Facebook App ID and Facebook App Secret from Facebook (Settings > Basic) to your site:
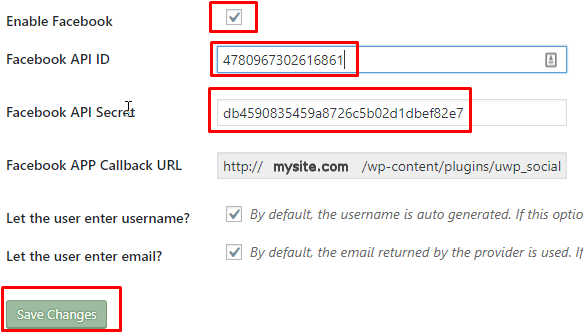
- Make sure to set the Facebook App live, in the top right corner, change

to

Read this blog post for more info: How to add Facebook App Login to Your WordPress Website
You can customize Users WP with CSS, too.
Here are some examples:
ShowField Labels
/*Users WP - Show field labels in all forms */
uwp_page .uwp-registration-form label, .uwp-registration-form, .uwp-account-form {
    display:inline-block
}
Introduction
Preparation
Setup
FAQ – Frequently Asked Questions
Introduction
UsersWP offers the Mailchimp Integration addon to allow your site visitors to easily subscribe to your Mailchimp email list. This guide explains how to setup the integration.
Preparation
For this guide, we assume you have completed the following:
- Installed and Activated UsersWP plugin
- Installed and Activated UsersWP Mailchimp integration addon
- Created your Mailchimp List
- Enable or Disable Welcome Email
Setup
Add the Mailchimp shortcode to the registration page:
[uwp_mailchimp]
Introduction
Page Settings
Change Password Settings
Menu Link
Introduction
This guide shows how to review the settings that allow your site visitors to change their password.
UsersWP is designed to allow users to change their password by clicking on a link to take them to a ‘Change Password’ page.
The setup is a three step process, to review pages, review change password options, and then add a menu link.
Page Settings

Visit the settings at:
UsersWP – UsersWP – General (tab) – General Settings (subtab) – General Options – Change Password Page
The selected page should contain the shortcode
[uwp_change]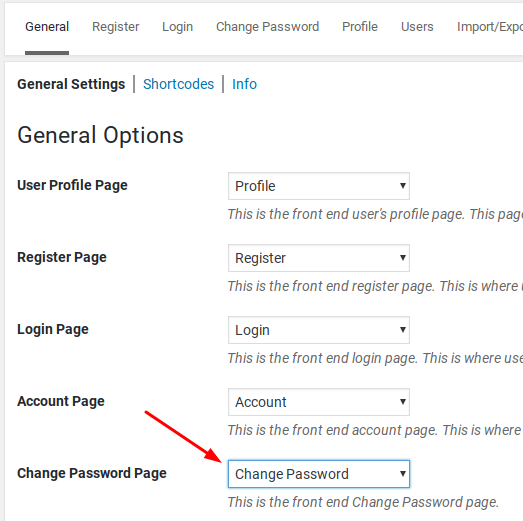
Password Settings
Visit the settings at:
UsersWP – UsersWP – Change Password (tab) –

There are two options here:
- Enabled Old Password? – This option adds an extra layer of security. User need to enter their old password before changing the password.
- Disable system generated password notice – This option will disable system generated password notice if user has not changed default password after registration.
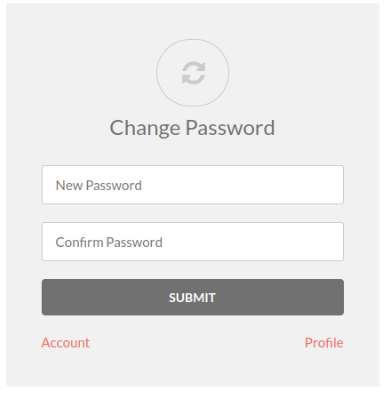
Without Old Password field
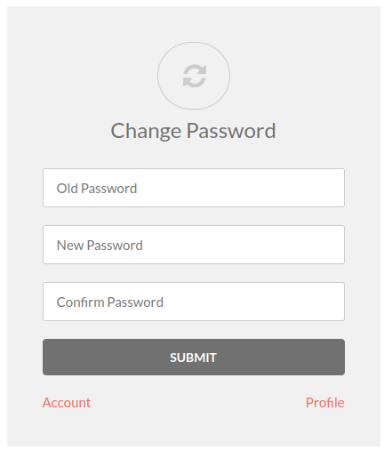
With Old Password Field
Change Password Link in Menu
Visit the settings at:
WordPress – Appearance – Menus
On this page there are several items to check.
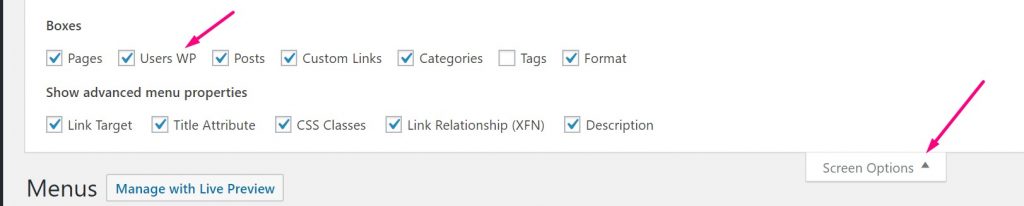
First check to make sure that the UsersWP link are diplayed. If not, adjust the screen options.
In case the UsersWP menu options are hidden:
- Click Screen Options in the upper right
- Place a check on Users WP
- Verify that the items are displayed
In the image below the links for Account, Profile, Register and Login are added to the menu called My Menu.
Select the “Change Password” page link and add it to the menu.
- Select a menu to edit and click Select
- Choose the UsersWP links to add to the menu and click Add to Menu
- Drag and drop to re-order the links then click Save Menu

Read more about UsersWP Menus
For more information visit the main doc: UsersWP Menus.
Introduction
Download
Install
Plugin Settings
Automatic Updates
Manual Updates
Update FAQ
Introduction
You can extend your site by adding any of the Addons.
You can buy individual Addons and Payment Gateways of your choice here, or you can buy a membership that includes all Addons and Payment Gateways here.
Download the new plugin
Once you have purchased a license you can find all the files and licenses for your Addons in the “My Account” section of the site here: https://userswp.io/your-account/.
- Purchase a license or membership to access the plugin.
- Login to your account on this site, and find the plugin you want to add.
- Click on the name of the plugin to download the ZIP file to your computer.
Install the new plugin on your site
- Log in to the WordPress Admin area of your site.
- Navigate to Plugins > Add New > and click on Upload.
- Browse for the plugin ZIP file on your computer.
- Click install.
- Wait for the upload to complete.
- Click to Activate the new plugin.
Review and adjust plugin settings
As soon the plugin is activated, you will be taken to the Settings page of the new plugin. You can adjust the settings now, or return to the same screen to continue with setup later.
Configure Automatic Updates
Automatic updates of Addons and Payment Gateways are handled through the WP Easy Updates plugin. Install the plugin and add your license to enable automatic updates.
- Download, install, and activate WP Easy Updates.
- Visit your account to retrieve license keys: https://userswp.io/your-account/
- Refresh the plugins page to see the License link next to each plugin.
- Click on the green text that says Licence and add your licence key.
- Click on Activate
- Once the license is activated, the plugin will now display information about updates when available, plus a link to automatically update the plugin.
Manual Updates
WordPress has a built-in feature to install themes and plugins by supplying a zip file. However, this only works for the original install of the plugin. It is not possible to upgrade a theme or plugin using the same process. Instead, WordPress will say “destination already exists” when trying to upgrade using a zip file and will fail to upgrade the theme or plugin.
Easy Theme and Plugin Upgrades fixes this limitation in WordPress by automatically upgrading the plugin if it already exists.
To perform a manual upgrade of an addon:
- Install and activate Easy Theme and Plugin Upgrades
- Download the addon you want to update from https://userswp.io/your-account/.
- Visit the plugin page of your site and choose “Add New” and then “Upload Plugin”.
- Find the addon file, and choose “Install”
- Next you should see a confirmation that the plugin will be updated, and in some case an option to backup the older version of the plugin.
In most cases, it is also possible to simply deactivate a plugin, delete it, and upload the new version. Check with the plugin author to find out if the plugin automatically cleans up data on uninstall. GeoDirectory plugins will not remove data or settings on uninstall unless the options are checked under the settings at GeoDirectory – General – Uninstall.
Frequently Asked Questions
Why do my automatic updates fail?
Incorrect/Updated License/Key
If you purchased a new subscription after your old one expired, your keys will have changed.
Get your license key from https://userswp.io/your-account/.
Carefully copy and paste into the appropriate license field.
Page Cache Issue
If you copied and pasted the key, but the update still fails, try:
1. Deactivate the key
2. Refresh the plugin page
3. Copy and paste the key again, then Activate
4. After activation, refresh the page again and try the update.
You can also try a manual update.
Review Setup of Automatic Updates
Find the setup guide for autoupdates here: https://userswp.io/docs/installing-addons/#updates
Double Check Licensing and Membership
Make sure your licenses are added at WordPress > Installed Plugins and that your membership is active.
I have a single site license. Why is my update failing?
If you have a single site license, then whenever your site domain changes you will need to update the license for each plugin. For example, you might have been working on a development site at one URL, and now you have moved the site to a new URL. Follow these steps to deactivate the license at the old URL and activate the license at the new URL.
Update single site license when the old site is still active
- Visit the old site at the old URL.
- Visit the old site plugin page.
- Find the addon license and click “Deactivate”.
- Visit the new site at the new URL and go to the plugins page.
- Find the addon license and paste your license code, then press Activate.
Update Single site license when the old site has been decommissioned or is otherwise not available.
It may be that you started working on a site, then changed the URL or deleted or otherwise decommissioned the site. In this case, follow these steps:
- Visit https://userswp.io/your-account/purchase-history/
- Select “View Licences” for the product.
- Select “Manage Sites”
- Select the sites where you want to deactivate the license.