How to Create a User Registration Form on Your WordPress Site

Looking to put a face and name to your visitors?
Let them register an account on your WordPress website with an easy user registration form.
How do you do that exactly?
In this blog post, we’ll show you how to create and customize a user registration form for your WordPress site.
Ready? Let’s go.
Why set up a user registration form?
Why should you bother setting up a user registration form on your WordPress site, you ask?
Well, we’ve got a few reasons that might just convince you:
- Customized user experience – By collecting info about your users through a registration form, you can tailor their experience on your site. Whether it’s personalized content or targeted ads, your users will feel like you really understand them (even if you don’t).
- Data, data, data – With a registration form, you can collect all sorts of data about your users. From their age and location to their favorite pizza toppings (hey, you never know when that info might come in handy), you’ll have a wealth of data to help you grow your site.
- Increased engagement – By making it easy for users to sign up for your site, you’ll likely see an increase in engagement. More users means more clicks, more comments, and more social shares. And who doesn’t love that sweet, sweet engagement?
- Ditch the labyrinth – A user registration form simplifies the sign-up process for your users. No more sending them to the wp-login.php page. clicking through multiple pages or filling out confusing forms. Just one simple registration form and you’re good to go.
So there you have it, folks! If those reasons don’t convince you to set up a user registration form, we don’t know what will. So go forth and conquer that registration process!
First, some preliminary preparation.
Before we get started with the actual setup, make sure you’ve completed the following:
- Installed WordPress
- Navigate to WordPress – Settings – Permalinks
- Choose Post Name or any other settings besides Plain.
- Save Permalinks Settings
Navigate to: Settings – Permalinks – Common Settings.
Choose Post Name or any setting other than plain. We recommend Post Name, but any settings besides plain will work.
Save the Permalinks Settings.
Step 1: Install UsersWP
You’ll need a plugin to create your user registration form.
We highly recommend UsersWP, since it’s a full-suite member management plugin for WordPress, so you can gain access to a powerful arsenal of community tools alongside your registration form.
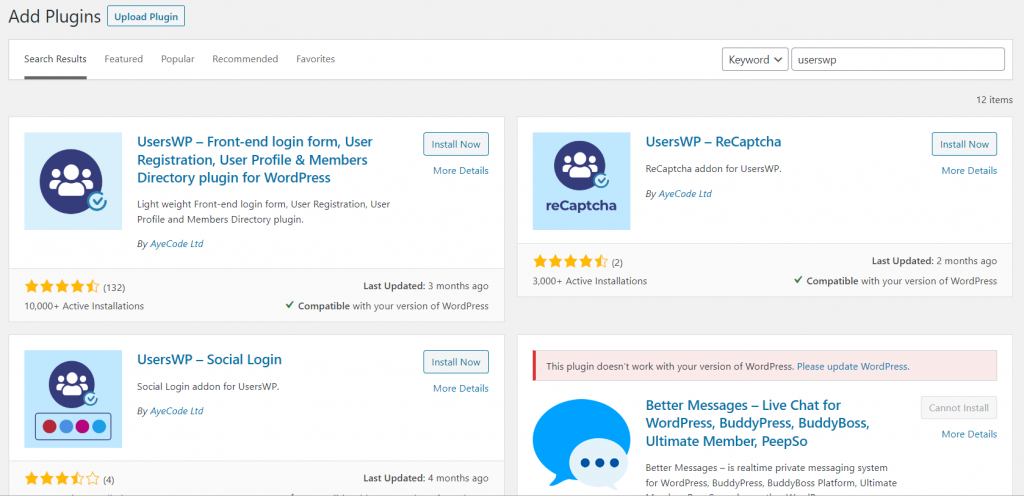
- Navigate to Plugins > Add New
2. Search for UsersWP
3. Install, then Activate.

Step 2: Create your menu bars
Before you actually design the form itself, you’ll need to create two menu items.
The first will direct users to the registration page, and the second will contain links that logged-in users can access — like a My Account page, change password, and log-out option.
- Navigate to Appearance > Menus in WordPress
Then, you’ll want to add a menu name, set the display location, and select your endpoints (the sub-tabs that will appear for new and existing users). Then click “Add to Menu.”
Remember, you can rearrange the pages to appear as main or sub-tabs in the drag-and-drop editor to make things more neat and organized:
Save your menu and voila, on your website, it will look something like this:
Now, users have access to all member-related options and can register easily without digging through the site.
Step 3: Design your user registration form
Time to actually create the form.
First, navigate to UsersWP > Form Builder.
You’ll be met with an array of field options to add to your user registration form. Use our drag-and-drop editor and customize it however you like with either pre-defined selections or create your own based on the nature of your business.
For example,
- Job title, expertise, and skills: Professional networking services may require a field for users to input their current position, qualifications, and talents.
- Dietary Restrictions: A business that offers meal delivery services may add a field for users to input their dietary restrictions.
- Interests/Hobbies: A membership site focused on a specific topic or niche (such as a fitness community or a photography club) may add a field for users to input their interests or hobbies related to the site’s focus.
- Goals/Aspirations: If it’s a site focused on personal development or self-improvement, you may add a field for users to input their goals or aspirations related to the site’s focus.
- Social media links: You can also add a field for users to input their Facebook, Twitter, Instagram, LinkedIn, YouTube, and other social media links to build more trust between the community with real, verifiable users doing human things.
Here’s what the interface will look like. On the left, you have your standard and pre-defined fields. And on the right, you’ll see the exact fields that have been added to your user registration form.
Once you’ve added all the necessary fields and saved your new form, you can click “Visit Site” on the top left and see your form in live action.
In this example, we added a Gender Field only and it would look something like this:
Congrats! Your registration form is live.
Step 4: Decide whether you want to moderate user registrations
Once your user registration form is live, you can decide whether or not the admin should verify the sign-ups.
No one wants to deal with spam and fake accounts.
You can make sure only legit users who meet the membership criteria can join the club.
When active, the moderation add-on features an extra option named “Require admin review” in:
UsersWP > Form Builder > Account > Form Options > Registration Action.
Once the user has completed all the required fields on the registration form and clicked the “Create Account” button, they will receive a notification stating that their account is currently being moderated.
They’ll receive an email confirmation once their account has been approved.
If the moderation setting is configured to “Require admin review,” new user accounts will need to be manually approved by an administrator.
In this case, a new option will appear in the UsersWP Moderation column, allowing the admin to approve or reject the new user.
The option to approve or reject the new user is also available within the user’s profile page for the administrator.
Until the new user account is approved, the user will not be able to log in to the site.
To decrease the load on your admin team, you can complement your manual moderation with user sign-up restrictions that let you auto-reject certain usernames or email domains.
Additionally, use the ReCaptcha add-on to implement an extra layer of Google security.
Step 5: Set notifications for a new user registration
To speed things up, your admin team (and community members) would benefit from real-time notifications on specific activities – from follows, friend requests, comments, replies, and of course, user verification requests.
For this, you’ll want the real-time notifications add-on, where you can enable user verification requests to be received by the admin if you want to moderate user sign-ups.
Both the admin and user will be notified during this process. Here’s a screenshot of a sample email notification you will receive when a new user is awaiting registration:
(Pro tip) Step 6: Implement a profile progress bar to encourage more complete registrations
With the Profile Progress add-on for UsersWP, site administrators can display a progress bar on users’ profiles using a widget, block, or shortcode.
This feature serves as a helpful reminder and incentive for users to complete their profile through the account page after they have registered.
Once activated, this plugin will create a settings page located in UsersWP > Addons > Progress.
Here, you can set the completion percentage for each profile field, including any custom fields you may have added.
Here’s what it looks like from the user side:
Step 7: Establish what happens post-registration
The journey doesn’t stop after a user signs up. There’s still some work to do!
In addition to sending notification emails, UsersWP also provides a confirmation message to users upon submitting a registration form.
There are three confirmation types available:
- Message: This is the simplest option – your users will get a confirmation message once they’ve submitted the form. But don’t let it be too simple! Make sure to thank your users for registering and let them know how excited you are to have them on board. A little bit of personality can go a long way, so have fun with it!
- For example, if you’re running a cooking website, you could say something like “You’re officially part of the kitchen crew! Get ready to whip up some delicious meals with us!”
- Show Page: This option lets you direct your users to a specific page on your website after they’ve registered. Take advantage of it! Make the page visually appealing with images or graphics, and give your users some extra incentive to stick around.
- For example, if you’re running a fitness website, you could direct users to a page with workout tips and tricks, or even offer them a free trial of your online workout program. Whatever you choose, make sure it’s relevant and valuable to your users.
- Go to URL (Redirect): With this option, you can send your users to a custom URL. This could be a specific area of your website or even a subdomain on your WordPress Multisite Network.
Step 8: Make the most out of user registrations with marketing & sales tools
When a user registers on your website, you can use UsersWP’s MailChimp integration to add a newsletter subscription option to enter them into your mailing list.
This is a great way to engage your users with content and promotions that directly relate to their interests – provided you have the content ready, of course!
But that’s not all – soon you will be able to also configure your user registration forms to accept payments using payment add-ons like Stripe, Authorize.Net, PayPal, and Square.
This is especially handy if you’re running a membership site and want to accept payments while your users register.
9. Allow users to interact with each other.
If you want your users to stay on your page for the longest time possible, add features that allow them to interact with each other.
Adding a forum, using the bbPress plugin is easy, and having the UsersWP bbPress integration makes that very easy.
You could also add a direct messaging system similar to the Facebook messanger.
Yes, UsersWP has that extra feature too with the User to User Private Messages add-on.
Ready to add your user registration form?
So there you have it!
Whether you’re running an eCommerce site, a membership site, or just want to keep track of your users, UsersWP makes it easy to create a registration form that looks great and works seamlessly.
Plus, with the option to integrate with email marketing tools like Mailchimp and Mailster, you can stay connected with your users and build a loyal customer base.
Pro tip: Grab an affordable membership for UsersWP and save 90% on all the game-changing features that help you make the most of your user registration (e.g., email marketing, profile progress, notifications, and sign-up moderation).
Ready to get started? Log in to your WordPress dashboard and install the free version of UsersWP today. Your users will thank you for it!
Happy registering! 🙂